23 Sep 2010

Upgrade License from MOSS 2007 Standard to Enterprise

Well, for some people, this particular steps are unknown, but it’s really easy to do. When you want to change the license type of Microsoft Office SharePoint Server 2007 from Standard License to Enterprise License, you don’t have to uninstall and then reinstall the license. Just enter the license into the Central Administration.

image 

Open the Central Administration, and enter the admin credential.

image

Click Operations tab.

image

In the “Upgrade and Migration” section, click the “Enable Enterprise Feature”.

Choose the Enterprise Edition, and enter the License Number, click OK. Wait the Upgrade process in a few minutes, and then proceed to “Enable Features on existing files”.

image

image

And you’re DONE!

17 Sep 2010

System.Windows.Forms.Timer is not Working in Windows Service

I’m really surprised to know that System.Windows.Forms.Timer is not working in Windows Service project type. The reason from Microsoft is just like this,

“Server-based timers use the thread pool internally, and the event handler runs in a thread taken from the pool. For this reason, conflicts might occur while the event handler is accessing shared variables and modifying controls and forms.”

For this reason, you can’t use the System.Windows.Forms.Timer to periodically run your custom code. Replace it to System.Timers.Timer will help you resolve the situation. I’m using Visual Studio 2010, so it’s very simple to change this code. After adding the ProjectInstaller to the project, then you see your Windows Service Class, and open it, so VS will open the designer for you.

Your windows service class 

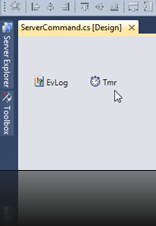
After open, just add the System.Windows.Forms.Timer from the Toolbox window.

image

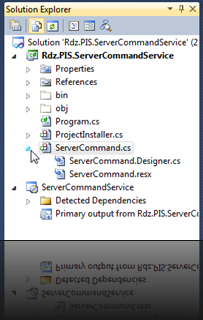
Right after that, open the (+) sign before your Windows Service class file in the Solution Explorer window, and open the “Designer.cs” (depending your project, it can be “Designer.vb”). In my project, the file is “ServerCommand.Designer.cs”, double click that file.

image

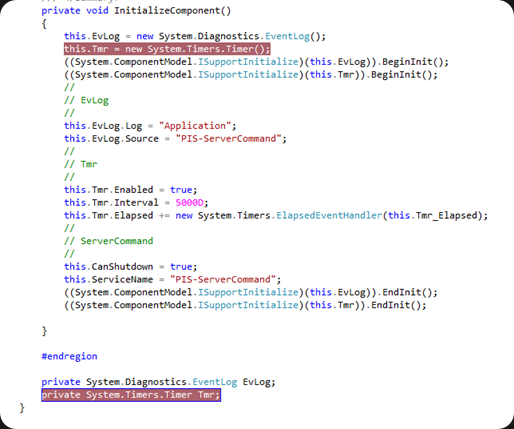
Change the content of “InitializeComponents” method, change the System.Windows.Forms.Timer to System.Timers.Timer. See the surrounding red background.

image

And, you’re done. You can add the Timer elapsed event. Double click your Windows Service class file. Double click your timer, and the “Elapsed” event should be added to the code.

image

And this is the example code for Elapsed event,

private void Tmr_Elapsed(object sender, System.Timers.ElapsedEventArgs e)
{
EvLog.WriteEntry("Ex Message", EventLogEntryType.Information);
try
{
System.IO.File.AppendAllText(@"D:\PIS-ServiceCommand " + DateTime.Now.ToString("dd-MMM-yyyy HH-mm-sss", System.Globalization.CultureInfo.CreateSpecificCulture("id-ID")) + ".txt", "sss");
} catch (Exception ex)
{
EvLog.WriteEntry(ex.Message, EventLogEntryType.Error);
}
}


Happy Coding…

7 Sep 2010

.NET SSH Connection using SharpSSH

Last week, I’ve been assigned to a new project. I must be able to parse the text output of a router, get the settings, and then doing something magic in .NET, either save it to Active Directory or something. Then, I found this .NET component, for free. You don’t have to pay for it, called SharpSSH. Well, I don’t care about how the DLL connect to the router and get the command output, but I do care of the result of the command output.

You can download the component in the website. The code are really simple, in this example is written in C#.NET. Oh… I almost forgot, you must add the Reference to Tamir.SharpSSH.DLL, and make sure that you add too the DiffieHellman.dll and Org.Mentalis.Security.dll. Actually we don’t really need those 2 DLLs, but Tamir.SharpSSH.dll does. So you must add the reference, or just include the DLL into the Debug folder in order to make your application runs well.

So here you go the code. First, add the “using” directive into top of your code.

using Tamir.SharpSsh;

And you’re ready to make the magic. First of all, there’s so many SSH class objects defined in the Tamir.SharpSSH.dll, but I choose SshShell. This is the code…

SshShell SSHConn = new SshShell("10.2.54.123", "dean");
SSHConn.Password = "deanp@w";
SSHConn.Connect();

Insert the IP, username, and the password, and Connect. Then you might want to look carefully before writing the code, you must first know the router output behaviour. In my environment, first login to the router, the prompt ended with the character like this “>”, and I must type “enable” and Enter, and then insert the password, and the ending prompt changing to “#”. This is important to make your code not “hanging” because of wrong character assigned to the SshShell object.

SSHConn.ExpectPattern = ">";
SSHConn.RemoveTerminalEmulationCharacters = true;
if (SSHConn.ShellOpened)
{
SSHConn.WriteLine("enable");
SSHConn.Expect(">");
SSHConn.WriteLine("deanp@w");
SSHConn.Expect("#");
SSHConn.WriteLine("term length 0");
SSHConn.Expect("#");
SSHConn.WriteLine("show run");
sOut = SSHConn.Expect("#");
SSHConn.WriteLine("exit");
SSHConn.Expect("#");
}

That’s what I’m talking about. After you’ve connected to the router, then the important thing is you must write your line of command to the router. To get the return and probably get the output to a string variable, you can assign variable like in my example, sOut. When you don’t want to get the return, just “apply” the command you’ve set for the router, just execute the “Expect” method, with the ending response of the router like “#” character.


After all, you must close the object using “Close” method, and you’re done.